Friday 29 October 2021

A Bolt Action Campaign, part 3: counterattack at Mill

During the last battle of our campaign, the Germans succesfully assaulted the Peel Raam stelling. Now for the first time the dutch would go onto the offensive, by counterattacking the recently conquered defense line at Mill in the morning of the 11th of may. Historically the attack consisted out of an amalgamation of various availlable units. 

We played a modified Point Defence scenario, with the three Pill boxes being the dutch objectives. Although we had both suffered casualties in the previous scenario's we could replenish most casualties and deploy full units. Because he wanted to take advantage of the availlable cover Michael deployed his forces relatively far forward  along the trenches. As usual we used our hidden markers for units that had not yet been spotted (Germans blue, dutch red). 
The first turn saw the dutch fire suppprt move up to the treeline allong the road, ready to fire at the defending germans. A platoon of two squads and a lieutenant were send to outflank, and the huzaren advanced on the left flank. Casualties were relatively light.
  The second turn started with a full on assault of the most forward german positions, and even though the german defensive fire caused some casualties the dutch infantry managed to redeem themselves and won the close combat. The germans redeployed some veteran infantry in the centre of their line to cover the retreating german right flank.
On the third turn the dutch left flank bravely advanced, but the german infantry and pioneers counter attacked, causing severe casualties on both sides. A squad of wielrijders reinforced the dutch left flank. On the dutch right flank the German defenders kept their heads down, avoiding the worst of the dutch direct artillery fire. 
The fourth turn started with a massive dutch artillery barrage smokescreen coming down in front of the pillbox on the german left flank. Under cover off the smoke, the dutch outflanking sectie(platoon) made a dash for the pillbox. This forced the german defenders to reveal themselves, trying to ambush the advancing dutch. In return they exposed themselves to the dutch firing line. 

In the mean time the dutch assault on the left flank reached the first german pillbox, which was quickly captured (due to a lack of firing slits on the rear, the germans had chosen to not occupy the pillbox, but to deploy their defenders behind them as cover).
The situation was not looking well for the germans, and since this was a campaign and not a one off, Michael wisely decided that it was better to save as many of his forces as possible, than to risk them all for the slim chance of getting a draw. The Dutch, having the second pillbox within reach, focused all their effort on it, and only consolidated their already succesfull left flank.
The battle ended with the dutch in firm control of two pillboxes, gaining the first Dutch victory of the campaign. The german choice for a forward defence turned out to be a costly mistake. Only a few of the german casualties would be replaced, and the loss of the light howitzer was costly. 


Just like history the dutch counterattack was succesfull due to a combination of bravado and a coincidental simultanious attack by two units. Unknown to the brave Dutch forces the rest of the Peel-Raamstelling had already been abandoned, so during the night the Dutch left their reconquered positions and retreated to the next defence line: the Zuid Willemsvaart.

Tuesday 17 August 2021

A Bolt Action Campaign, part 2

Last week, we played our second battle in the Bolt Action may 1940 campaign we started. This time the german invaders came to face the first real defence line: the Peel-Raam stelling. Though the line was supposed to be abandoned, the troops arround the village of Mill found themselves engaged on the 10th of may and unable to withdraw. 

The dutch defence consisted out of pillbixes along a water filled anti tank ditch (defensie kanaal), then minefields and barbed wire defences and subsequently two lines of defensive entrenched positions. The germans managed to cross the defence lines early on in other places through the use of an armoured train and at other sectors of the line where the dutch forces had already been ordered to withdraw.

As a game scenario we used a modified attacker-defender scenario(breakthrough) from the main book. The german objective is to get troops behind the dutch defensive lines, the dutch need to prevent that from happening. Because of the german breakthrough's they are allowed to outflank.
We used our homebrew hidden setup for the 750 points dutch forces. The germans had 1000 points of attackers availlable. They put an officer and two infantry squads in outflank. Then they advanced their artillery, mortar and free air observer into the area with the small woods, since that offered virtually the only cover for the germans. The preliminary barrage caused a fair number of pin markers.

The first turn of the game the dutch used to rally as many of their units, except for the pillboxes who opened fire on the advancing german infantry. The germans used their panzer 2 tank (represented by the pzr4, due to a lack of an appropriate model)to screen their infantry. Because hidden units can only suffer pin markers (house rule) the deadly accurate mortar fire did not yet wreak havoc, but pinned the  units that Michael thought would most likely be the dutch light howitzer present.
The second and third turns saw the germans suffer casualties due to fire from the dutch pillboxes. A dutch artillery barage failed to cause any lasting impressions, but the german luftwaffe airstrike did cause a considerable amount of pinmarkers. The dutch inexperienced captain proved a worthwhile investment, his +3  within 12" on morale and order tests allowing me to rally and keep putting units on ambush. 
The deadly german mortar and light howitzer managed to virtually destroy a dutch infantry squad defending the lines. Luckily for me this was my 'free' squad, so i would not have to replace them in the post battle campaign sequence.

By the fourth turn the germans had, at a cost, taken the three dutch pillboxes. The dutch however, despite the accurate german artillery, still firmly held the trenchlines with multiple units on ambush. A few fluke dicerolls had even enabled them to save two of the three pillbix crews from destruction and retreive them safely behind the lines. 
On the fifth turn the first german outflanking units showed up, unfortunately, the veteran pioneers failed to show...the remaining german infantry unit was badly mauled by the dutch artillery piece in ambush, and the german officer first lost his aide and was subsequently taken down in assault. 
On the last two turns the pioneers heroicly managed to save the day by showing up and destroying the dutch artillery piece in assault, winning the game for the germans. Because we are playing a campaign and casualtues can be hard to replace, both sides conserved their forces. In the last turns there were no last ditch assaults that would have occured if this was a one-off: the risk of losing a lot if troops without gaining significant advantage was just to great. 

The germans suffered quite few casualties, but because they won the game were able to tend to their wounded and received enough reinforcements to recoup their loses. The dutch however could not replace al the lost infantry, starting to feel the strain of a campaign game. The homebrew scenario felt balanced and the battle was a tence affair right untill the last turns. The hidden/fog of war markers worked well again: the germans focused their fire on a unit they thought was the dutch artillery piece, while in truth it was the dutch medic, and the artillery was safe behind the lines in ambush, waiting for the outflank.

Next time, the dutch are going to try to retake the lost positions in a counter attack, switching the roles of attacker and defender. 

Friday 6 August 2021

A Bolt Action campaign: may 1940, invasion of the Netherlands

After months of planning and a sneaky pandemic my friend Michael and myself finally started our Bolt Action campaign this week. We are using the campaign rules as published by warlord Games, with a few houserules to make them slightly less convoluted.

We plan to fight 6 consecutive games, representing the advance of german forces through the south of the Netherlands in may 1940. We plan to modify existing scenario's from various books to suit our games. The following battles will be played:

Raid of the Heumen lock-complex (may 10th, Maas-Waal channel defence line)
Assault of the Peel-Raamstelling at Mill (may 10th)
Counterattack at Mill (may 10th)
Hasty Defence of the Willemsvaart (may 11th)
Retreat through Brabant (may 12th)
Attack on Dordrecht (May 13th)

The campaign rules allow each player to assemble a company size masterlist with support units, from which you select units for each battle. Casualties suffered need to be replaced after each battle with reinforcement points earned. Surviving units can gain experience.

To introduce a Fog of War in bolt action, we used counters to represent units deployed, which would only be replaced with their corresponding units when they fired, or moved out of cover into line of sight. Counters can be targeted by fire, but only suffer pin markers.

Raid of the Heumen lock-complex
Early in the night german infiltrators dressed as railroadworkers and military policemen tried to seize various bridges across the Maas-Waal kanaal. In some cases they were uncovered by the border battalioans guarding these bridges, or the bridge was blown with infiltrators on top off it. At Heumen some 30 german soldiers managed to get across the bridge at a lock compex, before revealing themselves and assaulting the defenders. They managed to hold out untill reinforcements arrived, thwarting various dutch attempts to retake the bridge and destroy it.

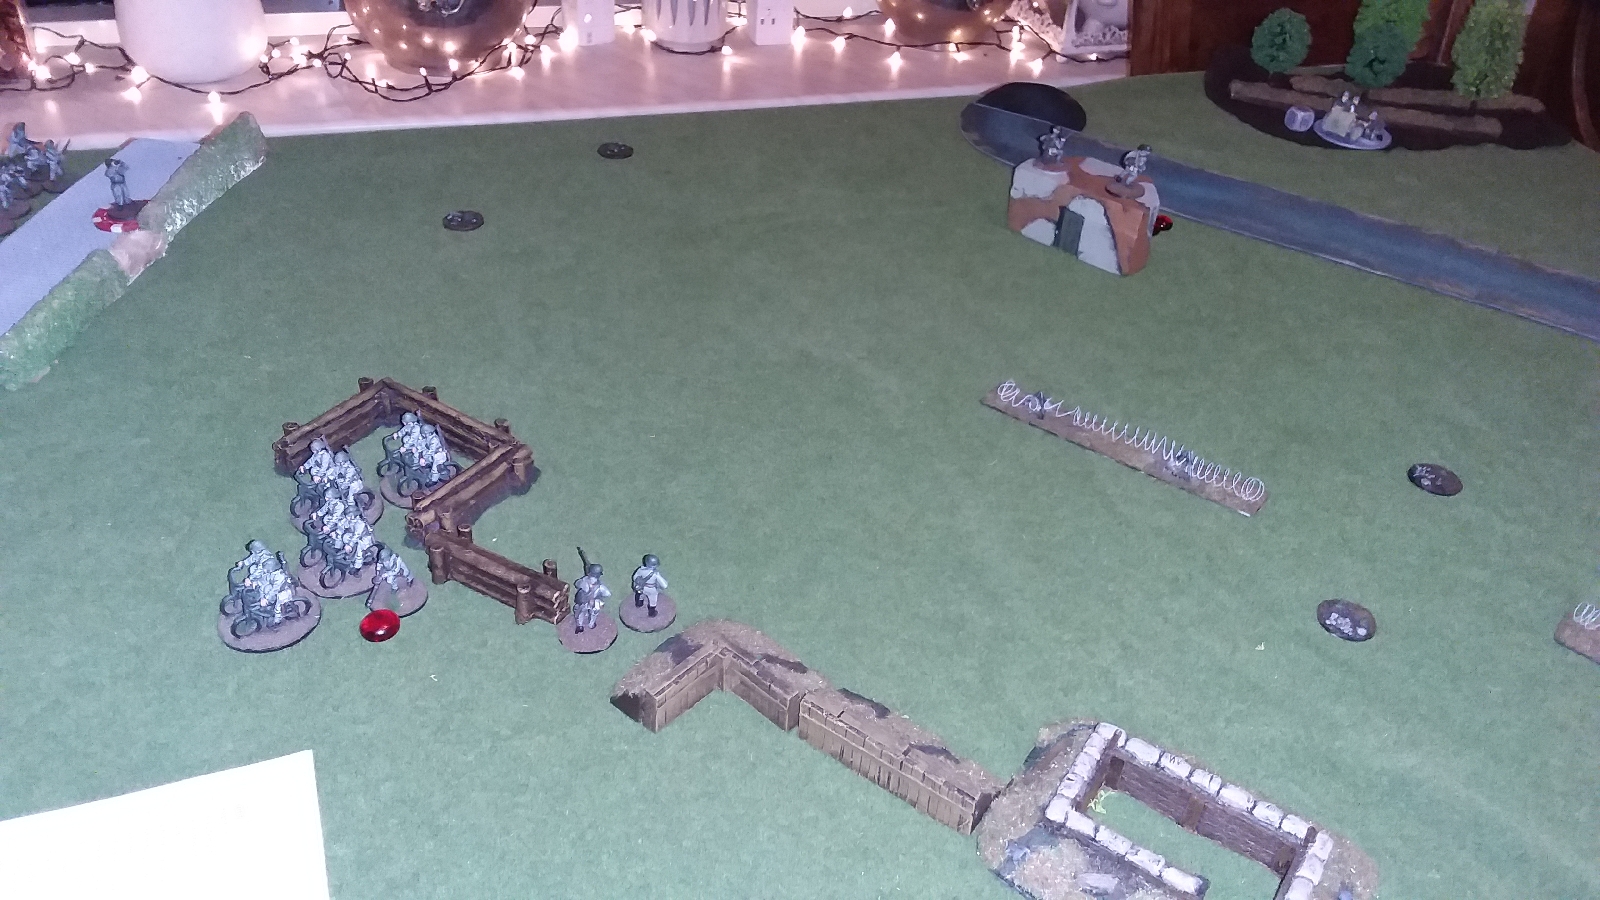
We started the scenario with two forces of 750 points. The germans (RED) could deploy up to 3 infantry squads and an officer on the dutch side of the bridge, within 12" of it. Other units had to start on the far side of the canal, which can only be crossed by infantry at the lock doors and the bridge. The Dutch start occupying the three bunkers and the breastworks present.

Objective of the germans is to take out at least two of the dutch bunkers covering the bridge, while the Dutch need to recapture either the bridge or the small wooden guardhouse next to it, in order to blow the bridge.
The first turn the Germans seized the initiative and surged a unit forward towards the bunker near the road. Dutch units fired upon the german infantry advancing towards the bunker, but came under intense artillery and mortar fire in return. On the left flank the units occupying the bunkers went into ambush, ready to counter any german attempt to cross the canal.

The second turn saw the germans seizing the first bunker in close combat. Accurate mortar fire hit the dutch unit covering the bunker. Dutch artillery fire form the ancient 8 staal covering the road failed to hit, but did convince the german officer to redeploy his infantry from the guard house in a safer position behind a nearby hedge, now that the first bunker was in their hands. A squad of german infantry took their chances and charged across the bridge to reinforce the units near the guard house.


The third turn saw two dutch infantry squads reveiling themselves and work their way up the side of the road towards the guard house. Aided by a Fubar on the german infantry that just crossed the road they bravely advanced. Elsewhere some shots were exchanged and some unrevealed units redeployed towards the tableside where the action took place.

On the fourth turn the dutch advanced further, coming within charge range of the empty guardhouse. The 8-staal in ambush still threatened the german units, so they sat tight and took some pinning shots at the advancing Dutch infantry. At the end of the turn the luftwaffe liaison called in a Stuka, which duly arrived and pinned a lot of dutch units and blasted apart one of the advancing infantry squads.

In the mean time a dutch unit of regular Politietroepen had arrived from reserve, took some potshots at the german occupying the nearby pillbox and at the start of the next turn charged in. They managed to retake the bunker with only minimal losses. As a reaction to this manouvre the germans advanced their veteran Infiltrators back towards the guardhouse and reoccupied it. The two units of dutch inexperienced troops near that same guardhouse remained pinned down, taking further casualties.

The last turns saw some scattered shots taken at various units, eliminating both the german and dutch light artillery. The dutch defenders on ambush detered any further german advances, and continuous german fire kept the advanced dutch units pinned down. We both tried to preserve our forces, unwiling to gamble with our troops, knowing that further casualties were going to be hard to replace. Thus the battle ended in a hard fought draw, with the germans still firmly in posession of the bridge, and the dutch clinging to their bunkers.

The recovery rolls in the post battle fase of the campaign allowed us to regain some lost infantry, and with the resupply points most casualties were replaced with new recruits. On both sides the mortars performed good and gained some hard earned xp, as did the german officer leading his men and the dutch politietroepen that retook the bunker. Next time the german's are going to assault the defences at Mill.